Configure Executable File Download in SWA
Available Languages
Introduction
This document describes the process of configuring Secure Web Appliance (SWA) to block downloading executable files.
Prerequisites
Requirements
Cisco recommends knowledge of these topics:
- Administrative Access to SWA
- Access to Graphic User Interface (GUI) of SWA
Components Used
This document is not restricted to specific software and hardware versions.
The information in this document was created from the devices in a specific lab environment. All of the devices used in this document started with a cleared (default) configuration. If your network is live, ensure that you understand the potential impact of any command.
Before you Begin
Cisco SWA can effectively block the download of executable files by inspecting Multipurpose Internet Mail Extensions (MIME) web content. By identifying file types such as application/x-msdownload, application/x-msi and other related MIME types, SWA enforces policies that prevent executable files from being delivered to users. In addition to MIME type detection, SWA can leverage file extension filtering, reputation-based analysis, and custom policy rules to further strengthen protection against unwanted or risky downloads. These capabilities help organizations maintain a secure browsing environment and reduce the risk of malware infections.
application/octet-stream is a generic MIME type used to indicate a file contains binary data. It does not specify the nature of the file, so it can be used for any file that does not fit a more specific MIME type. This is commonly assigned to executable files, installers, and other non-text files when the web server cannot determine a more precise type.
Configuration Steps
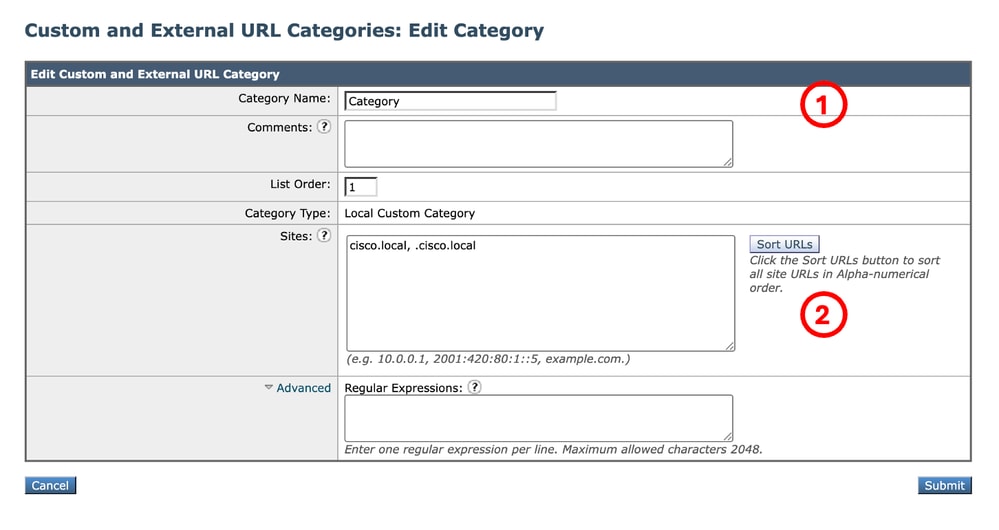
| Step 1. Create a Custom URL Category for the Website | Step 1.1. From the GUI, navigate to Web Security Manager and choose Custom and External URL Categories. Step 1.2. Click Add Category to create a new Custom URL Category. Step 1.3. Enter Name for the new category. Step 1.4. Define the domain or subdomains that you want to block file downloads (in this example, cisco.local and all its subdomains is used). Step 1.5. Submit the changes.
|
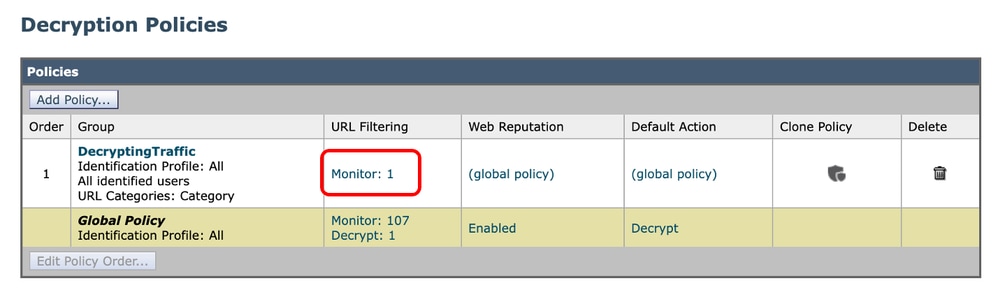
| Step 2. Decrypt the traffic for the URL | Step 2.1. From the GUI, navigate to Web Security Manager and choose Decryption Policies Step 2.2. Click Add Policy. Step 2.3. Enter Name for the new policy. Step 2.4. (Optional) Select the Identification Profile where this policy applies. Step 2.5. From the Policy Member Definition section, click the URL Categories links to add the Custom URL Category. Step 2.6. Select the URL Category created in Step 1. Step 2.7. Click Submit. 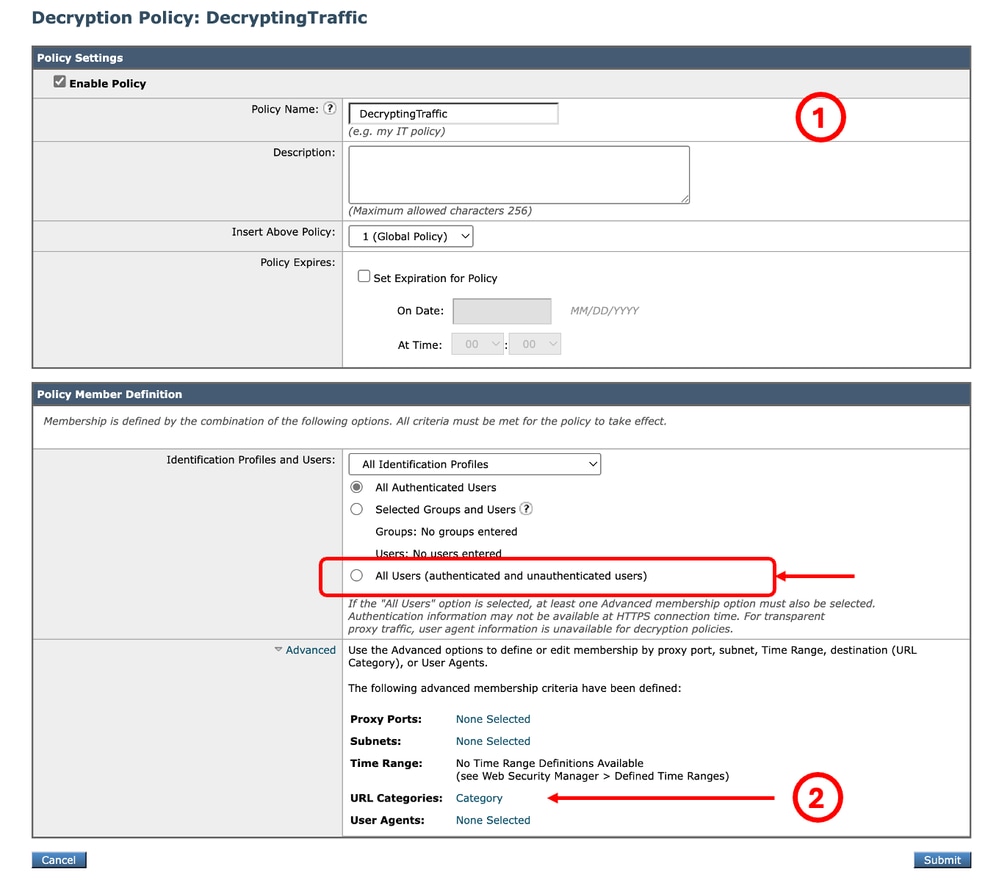 Image - Create a Decryption Policy Step 2.8. In the Decryption Policies page, click the URL Filtering for the new policy.
Step 2.9. Choose Decrypt as the action for Custom URL Category. Step 2.10. Click Submit. 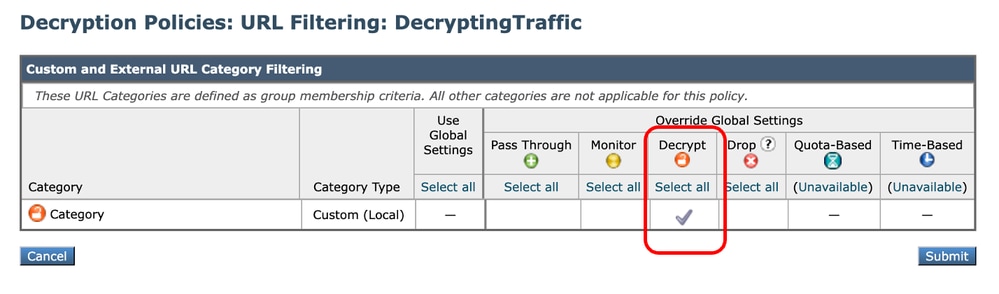 Image - Set Decrypt as Action |
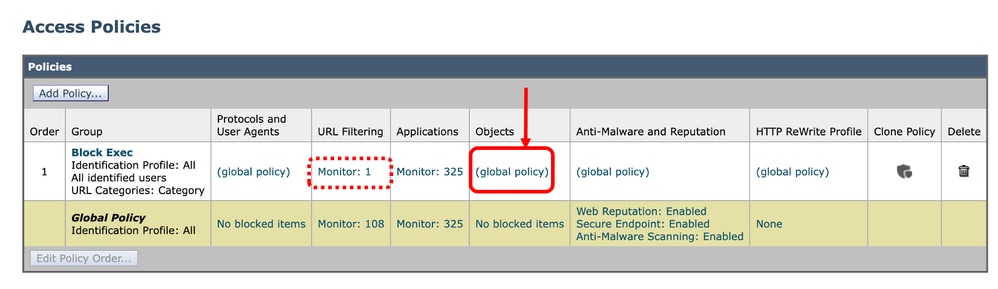
| Step 3. Block the Executable Files | Step 3.1. From the GUI, Navigate to Web Security Manager and choose Access Policies. Step 3.2. Click Add Policy. Step 3.3. Enter Name for the new policy. Step 3.4. (Optional) Select the Identification Profile that you need this policy applies to. Step 3.5. From Policy Member Definition section, Click URL Categories links to add the Custom URL Category. Step 3.6. Select the URL Category that was created in Step 1. Step 3.7. Click Submit. 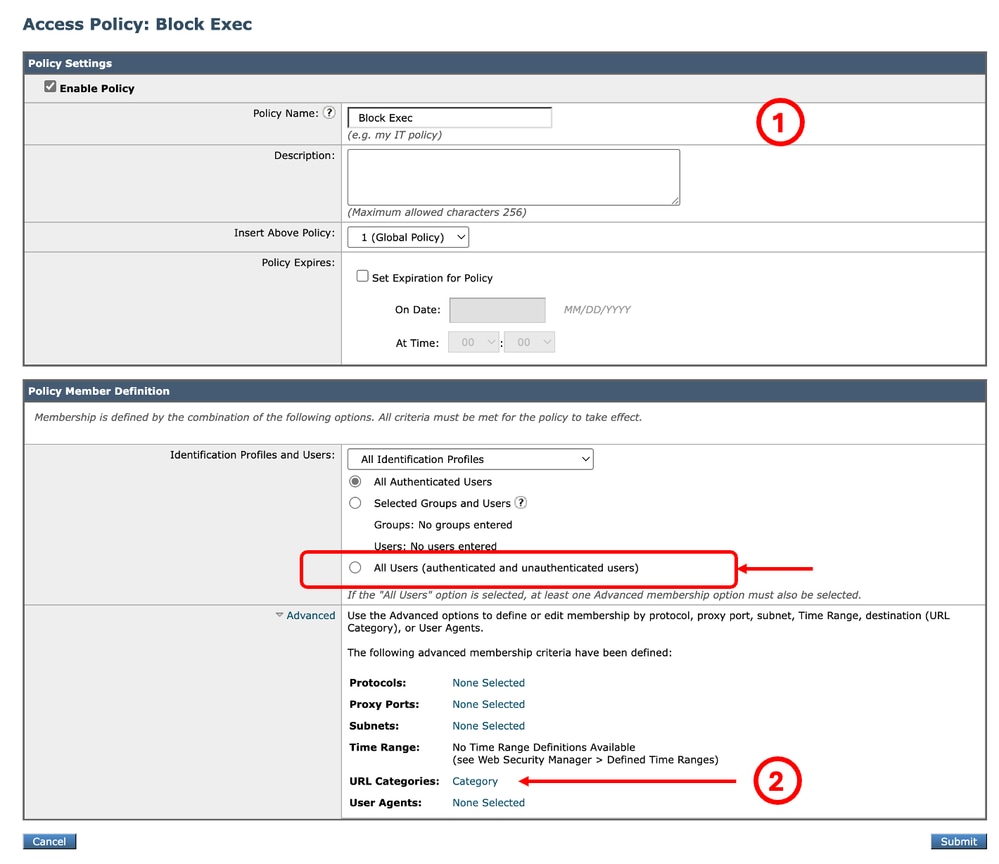 Image - Access Policy Step 3.8. In the Access Policies page, ensure the URL Filtering action is set to Monitor. Step 3.9. In the Access Policies page, click Objects for the new policy.
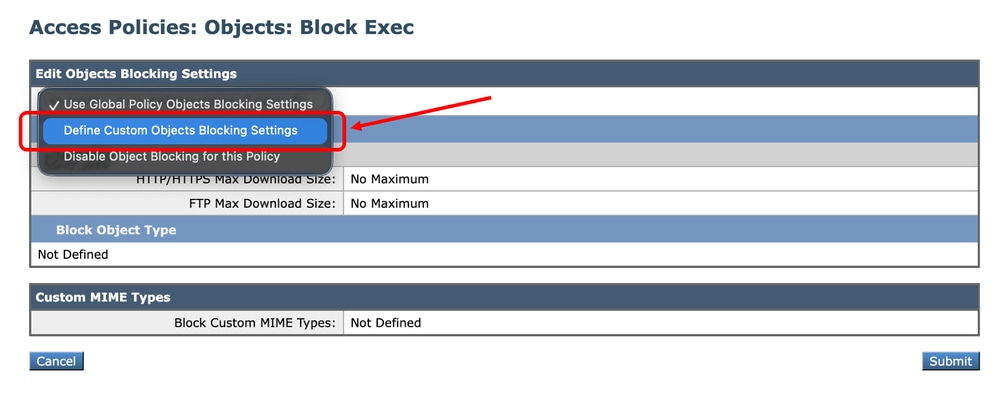
Step 3.10. From the drop-down menu, choose Define Custom Objects Blocking Settings.
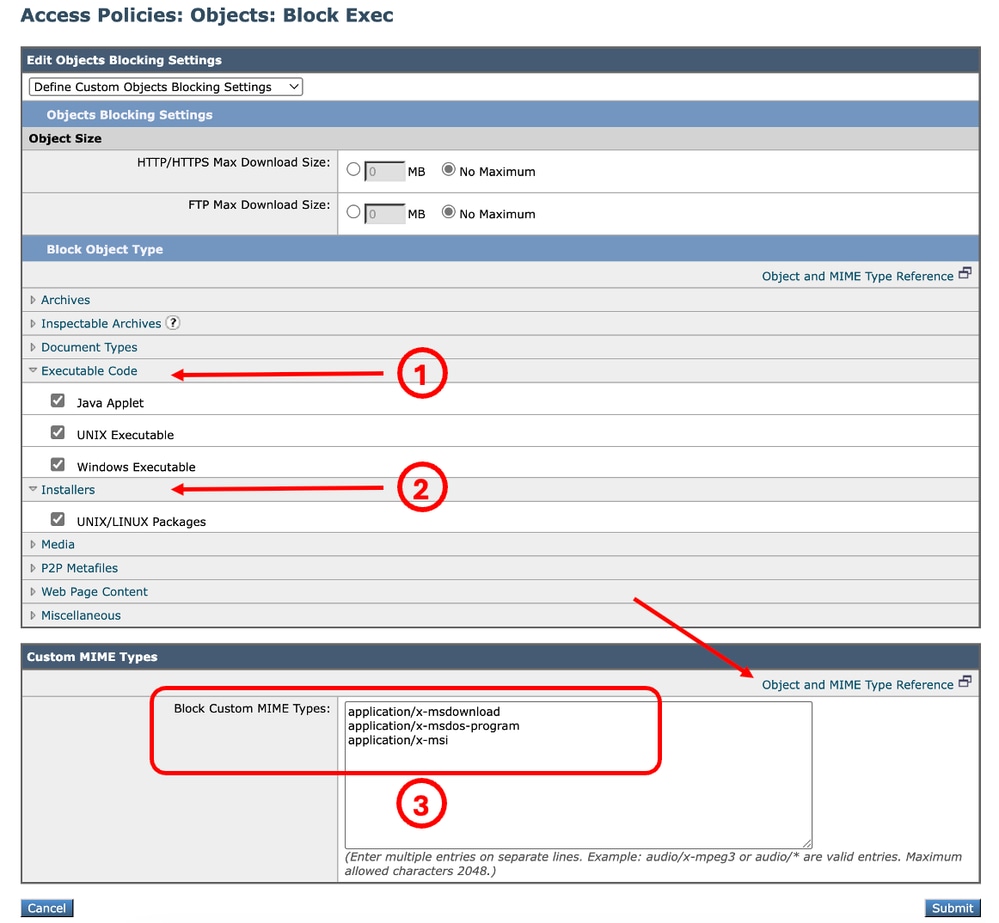
Step 3.11. Select Executable Code to select the types of Objects to block. Step 3.12. Select Installers, to select the types of Objects to block. Step 3.13. Additionally, you can enter the MIME type, which is the type of file(s) you want to block in the Custom MIME Types section.
Step 3.14. Submit. Step 3.15. Commit changes. |
Validation of File Extension Blocking
In this example, when a user tries to download an executable file, this warning page is displayed:
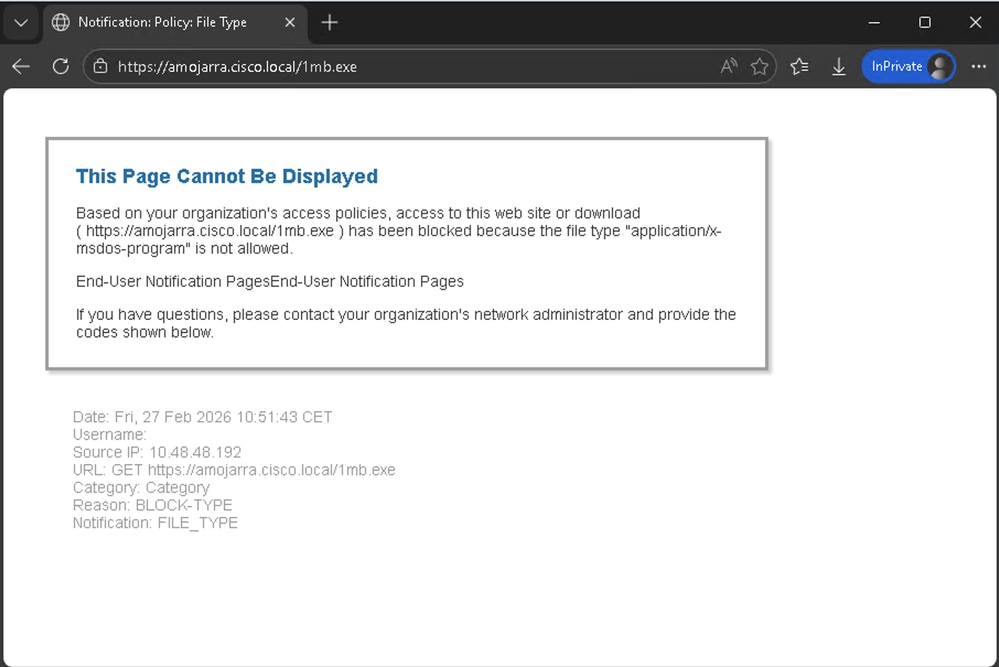 Image - Blocking Notification Page
From the access logs, you can see two log lines related to the traffic. The first log line is related to the Decryption Policy (Name: DecryptingTraffic) that is decrypting the Traffic. The action is DECRYPT_CUSTOMCAT.
The second Access Log line is related to the Access Policy (Name: Block_Exec) that created in Step 3. The action is BLOCK_ADMIN_FILE_TYPE.
| Policy | Access Log |
| Decryption Policy | 1772186569.823 182 10.48.48.192 TCP_MISS_SSL/200 39 CONNECT tunnel://amojarra.cisco.local:443/ - DIRECT/amojarra.cisco.local - DECRYPT_CUSTOMCAT_7-DecryptingTraffic-DefaultGroup-NONE-NONE-NONE-LAB_Access-NONE <"C_Cate",-,-,"-",-,-,-,-,"-",-,-,-,"-",-,-,"-","-",-,-,"-",-,"-","-","-","-","-","-","-",1.71,0,-,"-","-",-,"-",-,-,"-","-",-,-,"-",-,-> - - |
| Access Policy | 1772186576.735 2242 10.48.48.192 TCP_DENIED_SSL/403 0 GET https:// |
Related Content
- User Guide for AsyncOS 15.2 for Cisco Secure Web Appliance
- Cisco Secure Email and Web Virtual Appliance Installation Guide
- Configure Custom URL Categories in Secure Web Appliance - Cisco
- Use Secure Web Appliance Best Practices
- Configure Firewall for Secure Web Appliance
- Configure Decryption Certificate in Secure Web Appliance
- Configure and Troubleshoot SNMP in SWA
- Configure SCP Push Logs in Secure Web Appliance with Microsoft Server
- Enable Specific YouTube Channel/Video and Block Rest of YouTube in SWA
- Understand HTTPS Accesslog Format in Secure Web Appliance
- Access Secure Web Appliance Logs
- Bypass Authentication in Secure Web Appliance
- Block Traffic in Secure Web Appliance
- Bypass Microsoft Updates Traffic in Secure Web Appliance
Revision History
| Revision | Publish Date | Comments |
|---|---|---|
2.0 |
20-Oct-2026
|
Updated title, spelling, grammar, spacing, inserted horizontal lines to separate sections for readability, fixed CCW alerts. |
1.0 |
27-Feb-2026
|
Initial Release |

 Feedback
Contact Cisco
- Open a Support Case

- (Requires a Cisco Service Contract)